Showing posts with label Valentine's Day. Show all posts

Monday, February 11, 2013

Cupcake Liner Bouquet of Flowers


Once again, I need to admit to a bit of an obsession. Cupcake liners.  It's even worse than the vintage bottles.  I just keep collecting them and collecting them.  Even *I* can't bake enough cupcakes to keep up with the influx of cupcake liners.  Well, I could try.  Maybe I will try...

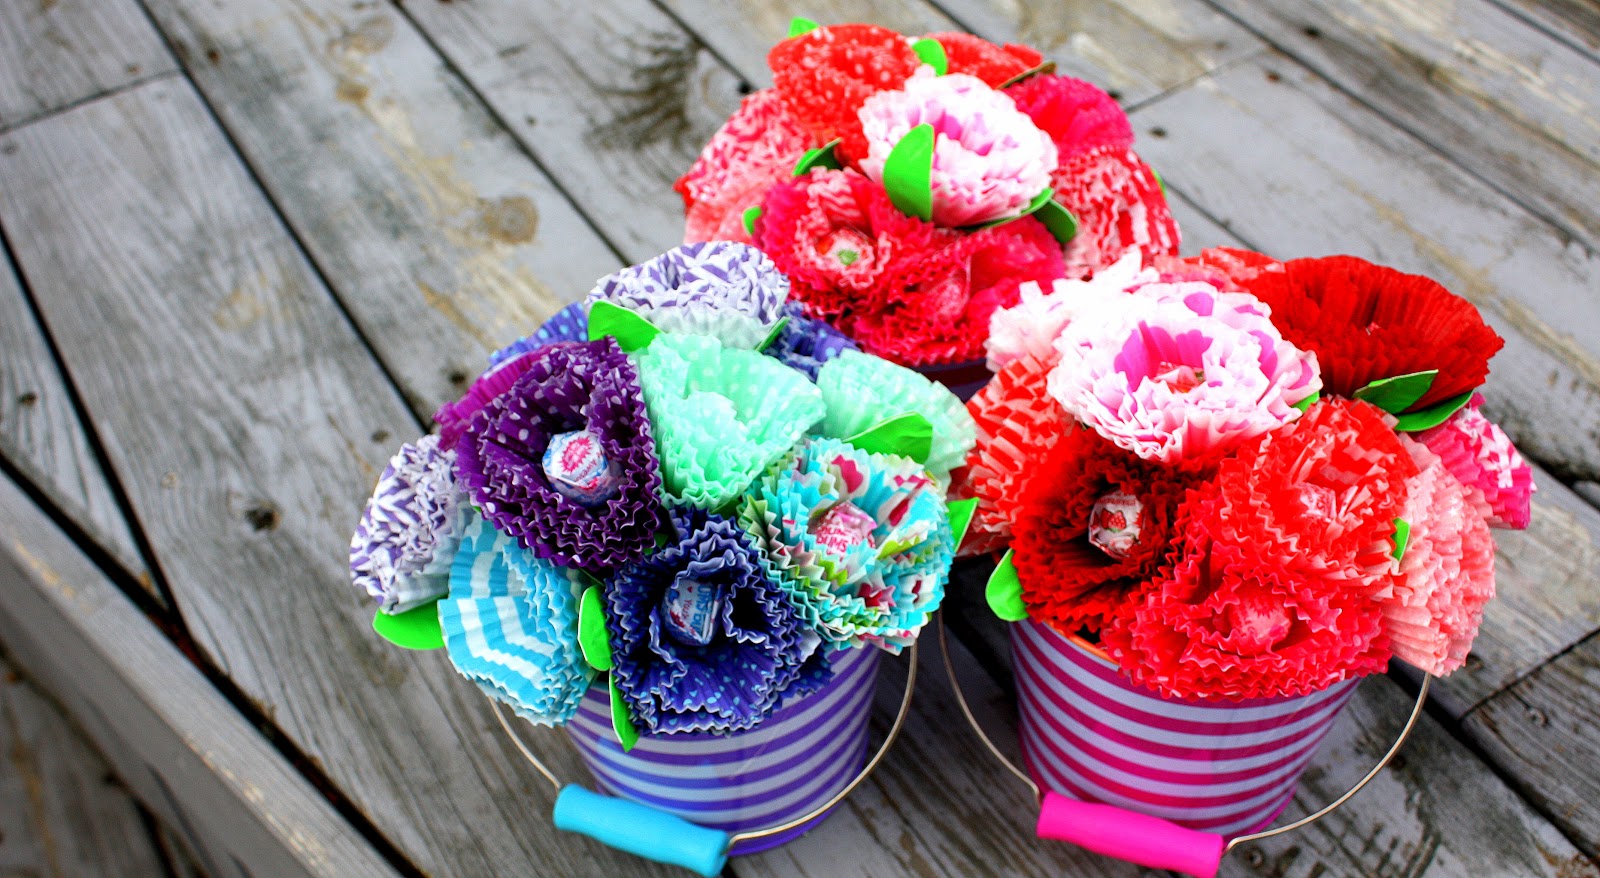
However, at this particular moment I am going to show you how to make these darling cupcake liner flowers. I made these as gifts for the monster's teachers for Valentine's Day.  These would be perfect for a birthday or just to brighten up a gloomy it's allllllmost Spring day.  I have made these in a variety of containers.  Flower pots are a great choice.  Last year I bought vintage McCoy flower pots at a yard sale.  You are only limited by your imagination. 

You will need:
1. A container of your choice
2. Styrofoam that fits inside of your container to hold the suckers in place
3. Cupcake liners - 6 per flower  (I get all of mine at The Bakers Confections)
4. Suckers of your choice
5. Green duck tape or masking tape
6. A hole punch
7. Floral Wire
8. Wire cutters to cut the floral wire
9. Scissors


Each flower needs 6 cupcake liners. Two of these liners will need a hole in the direct center.  Fold it in half and use the hole punch to make a hole in the center.  Then unfold them so that they are flat.


Fold the other four liners in half and then punch a hole about a fourth of an inch above the fold line.  These will remain folded in half to make your flower petals. Now add them onto your sucker stick.  First add the four that are folded in half, turning your sucker one quarter turn for each petal.  Then add the final two that have the hole in the center. 


And now you have flowers.  Have fun with these.  Mix patterns.  Use colors that you wouldn't normally put together.  Use cupcake liners that have scalloped edges or use mini cupcake liners inside and then standard size on the outside petals.  They will be gorgeous.  Trust me.


Now... take one strip of green duck tape and lay it flat on the table.  I would suggest 6 - 8 inches.  Then lay a piece of floral wire of the same length on top of that.  Finally, add another piece of duck tape enclosing the wire in the middle.  (Isn't it duct tape?  Why am I thinking that?)  Now you can trim the strip of tape so that it looks like leaves on each end.  Don't worry about being precise.  Just do the best you can.


 Now you need to twist the leaf around the base of the cupcake liners so that they won't slide down.  This holds the whole thing in place.  Plus, the "leaves" look pretty peeking out of your bouquet.
 

All you have left to do is arrange your flowers.  I needed some height for some of mine, so I used the duck tape to attach a Wilton lollipop stick to the existing sucker stick to give it an extra few inches.  It was exactly what I needed to make my bouquet full on the top.

And there you go!  The perfect gift for someone you care about.  Have fun creating. 
 

Saturday, February 9, 2013

Vintage Bottles - Valentine's Day

 
So, I have this thing. Obsession would be very strong word. But it would be correct. Ahem.
 
I love collecting random vintage bottles and jars.  I just can't walk away from them.  I mean, come on... they clearly need me to love them.  The ones above just happen to be a small portion of my collection.  A small collection of the clear ones.  Not the blue. Or the green. I told you it was bad.
 
I hid them for a while. I do that sometimes. But then one gloriously sunny day I decided that they needed to be proudly displayed in front of my living room window.  So, I set them all up with a dozen or so white daisies in the bottles and then stood back and proudly watched the sun bounce off the glass. They made my soul happy. I was outside watering the zinnias that grow in front of that window later when Brad came home from work. 
 
"What in the world are those?" he patiently inquired.
 
"Aren't they fun? They look all trendy and happy," I answered.
 
"Or... like we are in an episode of Sanford & Son," he said.
 
"I'll potentially take that under advisement. It doesn't look good for you though, so don't hold your breath."
 
He sighed. The bottles remained. I won.
 
 
Fast forward a year and I may or may not have told Brad that the bottles had been donated to Goodwill. Perhaps. So, they are all going incognito for Valentine's Day.  A few heart shaped doilies, some Baker's twine and some hearts made out of corrugated cardstock and they are barely recognizable. Well, maybe that's a bit of a stretch. 


I originally saw this idea on Pinterest.  Where else? She used Mason jars. If I was obsessed with Mason jars, we would have to move into a bigger house. So, see? I've got that going for me.


The pins and hearts were part of my crafty stuff stash.  The Baker's twine came from The Baker's Confection and the doilies I picked up at JoAnn Fabric. They are filled, at the moment with red tulips.  Last week it was carnations. Love love love. I think you need to make some.  Don't you?

But now how to disguise them for Easter...

Friday, February 8, 2013

Valentine's Day Peanut Butter and Jam Cookies

I adore February.  I love that there is a little more sunshine filtering through my windows.  I love that I can buy tulips at the grocery store.  And I love that we focus just a little bit more on how much we love those special people that we have in our lives.  At our house, it's Love Month.  And nothing in the world says, "I love you" to my husband quite like peanut butter cookies. 
 
 
I make these cookies often and I have used different fillings for them.  I have used Michigan Tart Cherry, Raspberry, Strawberry, Grape and even milk chocolate.  The monsters prefer strawberry, which is what I used here. 

 
The ingredients are very straightforward and probably things that you already have on hand. 
 
For four dozen cookies, you will need:
- 3 cups of all-purpose flour, sifted
- 3 tsp. baking powder
- 1/2 tsp. salt
- 2 sticks of unsalted butter, room temperature
- 1 cup granulated sugar
- 1 cup brown sugar, packed
- 2 cups creamy peanut butter
- 2 large eggs, room temperature
- 2/3 cups of your favorite jam, seedless works best
 
1.  Preheat your oven to 350 degrees.
2.  Sift together your dry ingredients in a medium bowl and set aside.
3.  Cream together the butter and sugars until light and fluffy. Be mindful that you are scraping down the sides of the bowl.
4.  Add the peanut butter and then the eggs, one at a time and mix until well incorporated.
5.  Slowly add the dry ingredients.  Slowly.  Unless of course you want flour on the ceiling.  In that case, rock it out.  Send me pictures. 
6.  Do not overmix this dough.  You want soft and fluffy, not hockey puck.
7.  Once everything is happily incorporated, the dough should have almost a playdoh consistency.  It should be very easy to handle.  Roll the dough into balls about 1 to 1-1/2 Tablespoon size.  You don't want them too small because you won't be able to add the heart without the cookie falling apart.  Find the size that you are comfortable with.


**If you would like to freeze this dough, go right ahead.  Once I roll the dough into individual balls, I fill a half sheet pan with them and stick them in the freezer until they are frozen through.  Once completely frozen, add to a Ziploc bag.  Whenever you are ready to bake them, just set however many you need out on the counter for about 20 minutes and you will be ready to proceed to the next step.** 

8.  Now that you have lined up the dough balls on your cookie sheet (lined with parchment paper or a silpat liner, please) then you will need to gently flatten them with the bottom of a glass.  Don't pancake them, just flatten the top so that you give yourself a smooth surface to work with.
9.  Using the end of a wooden spoon, make three indentations so that they form an inverted triangle.  That usually gives me the best guide on how to make my heart. 
10.  Slide these in the oven for 12 minutes at 350 degrees.  You did preheat your oven, yes?


11.  After 12 minutes, you can see that the indentations puffed up a bit.  Take the wooden spoon again and just flatten out the hearts again.
12.  Warm up your jam in the microwave about 20-30 seconds, or until it is smooth and easily stirred.  This will make your life easier as you take a spoon and gently pour the warmed jam into the heart indentations.  Slow and steady.
13.  Once all of the hearts have been filled, slide them back into the oven for an additional seven minutes. 

 
And there you go.  Perfectly adorable cookies for that special someone on Valentine's Day.  What are you baking this February?


Monday, February 14, 2011

The Perfect Valentine's Day Breakfast

Every year we have a huge big breakfast for Valentine's Day. I love the early morning sunshine that brightens our table. I also love a good excuse to put out bowls of candy. Shocked, aren't you? My favorite red tulips and hearts cut out of vintage road maps (that I bought HERE) completed the table.
A pile of pink pancakes always makes me smile. They were more or less in the shape of hearts. Leaning a little more towards less.

Strawberry yogurt parfaits were the hit of breakfast. Plus, they were pretty. And we all know how much I love pretty food.

My favorite part of the entire table were the name tags. Each beloved family member got a love note. It was the perfect way to start the day. I hope that your Valentine's Day was as love-ly as mine.

Friday, February 11, 2011

We Absolutely Love Cupcakes

Um, duh. Was there ever any doubt?

Once again we made Valentine's Day Rainbow Cupcakes. I must say, I loved looking back at the pictures from two years ago. The kids have gotten so big! Paiz was rocking it out in her high chair. Holy.cow.I.am.old. Just sayin'.

I love using these baking cups when I make cupcakes. They are easier for the kids to fill because they stand alone on a cookie sheet without having to use a muffin tin. They are a little more forgiving to Paizlee swinging batter around. Just take a pair of scissors and make a tiny snip at the rim of the cup so that when it comes time to eat, all you have to do is gently tear away the baking cup.

I just love how pretty these cupcakes are. I made these at Halloween using green, orange and purple batter. I have a major weakness for pretty cupcakes. Oh, and reasons to use sprinkles. I will do pretty much anything that involves sprinkles.

Breuklyn is very serious about decorating cupcakes. This is obviously a very serious business. She is also the first one done. She knows what she wants, gets is accomplished and is then happily munching on cupcakes while Maddux is still fretting over the perfect application of frosting. I love that she always knows what she wants and very often has no problem accomplishing exactly that.

Notice that Maddux is wielding an off-set spatula. No spoon for him. He wants the real deal. He has carefully sampled the frosting and since it met his inspection he will now spend 15 minutes frosting a single cupcake. While Paizlee and Breuklyn hoarded their cupcakes, Maddux was the only one who shared his cupcakes with Brad. Poor Brad. No one wants to share with him. Just where is the cupcake love, people?

Now this kid, she is all about the sprinkles. I can't imagine where she gets it from. The pinker, the better. She carefully arranged her heart sprinkles so that they were sticking up out of the cupcake. She licked all of them to make sure they would stick. She also licked the cupcake to make sure the frosting would stick. She is nothing if not dedicated.

You know that you just need to make these cupcakes this weekend, right? You can hear the sprinkles calling your name, can't you? If not, it is because Paiz ate them all.

We will be up to our eyeballs this weekend in making Valentines, creating teacher's gifts and We Love Breuklyn Day adventures. I hope that your weekend is just as lovely.

Thursday, February 3, 2011

Valentine's Day Peanut Butter and Jam Cookies

Otherwise known as my new favorite cookie of all time. That is right, people. Of.all.time.

You can find the original recipe here. For four dozen cookies (instead of the two dozen called for in the original recipe) you will need:
  • 3 cups of all-purpose flour, sifted
  • 3 teaspoons baking powder
  • 1/2 teaspoon salt
  • 2 sticks unsalted butter, room temperature
  • 1 cup granulated sugar
  • 1 cup packed light-brown sugar
  • 2 cups creamy peanut butter
  • 2 large eggs
  • 1/3 cup seedless raspberry jam, stirred
  • 1/3 cup seedless strawberry jam, stirred
This is one of those recipes that is easily adaptable for kids. It isn't finicky and yes, it's a little time-consuming, but there are lots of opportunities for little hands to help out.

Sift together your dry ingredients in a small bowl; set aside. Cream together the butter, granulated sugar and brown sugar until light and fluffy. Scrape down sides of the bowl often. Add the peanut butter and then the eggs. Mix until fully incorporated. Gradually add the dry ingredients. Mix until just combined.

The dough should now be almost a play-doh consistency. It was easily rolled into balls and not at all sticky. If you find it to be sticky, put it in the refrigerator for 10 minutes and then proceed.

Preheat the oven to 350 degrees. Roll the dough into 1-1/2 inch balls. The actual amount is just about 2 Tablespoons. You want them to be a little bit big because it makes it easier to add the hearts later.

You can absolutely freeze the dough at this point. Freeze them individually on a cookie sheet and once they are frozen, throw them into a Ziploc bag. When you are ready to use them, put the bag in your refrigerator for an hour so that they can thaw a bit and then proceed.

Slightly flatten the cookies with the bottom of a drinking glass. Don't get too carried away, you want the thickness. Space the cookies about an inch and a half apart on cookie sheets lined with parchment paper.

Since my fingers are of the short and stubby variety and they are not at all helpful in pressing delicate hearts into cookies. However, the end of my wooden spoon is the perfect alternative.

Once you have completed this step, pop the cookie sheets into the fridge for 20 minutes to chill. Then, bake for 12 minutes in your preheated oven.

At the end of 12 minutes, remove the cookies and then reshape the heart in your cookie. You will find that it has gotten puffy in the oven. Flatten it out using the wooden spoon. Then fill the indented heart shape with your choice of seedless jam. I used strawberry for the first batch and raspberry for the second. Bake for an additional 7 minutes.

Brad, who hates it when I mess with his peanut butter cookies, has pronounced these to be his new favorite cookies. This man has never loved anything except plain old peanut butter cross-hatched cookies, so this is big. They will make the prefect addition to the ten thousand (or three) Valentine's Day parties that they kids will be having at school. Yum.

I hope that your February is full of cookies!

Saturday, February 20, 2010

Proofreading is a Good Thing

I was sure that Breuklyn would want to go with store bought Valentines this year. We dutifully checked out the Hannah Montana, Disney Princess and Tinkerbell varieties. Breuklyn looked up at me with a look of deep concentration etched into her adorable almost 7-year-old face and said, "Mom, these just aren't as cool as the ones that we made last year." So, with a happy heart she proceeded to dig through all of the buttons, glitter, felt and paper that she could possibly desire to create her class Valentines.

While she rocked out to the Phineas and Ferb soundtrack and set about to her task of 18 Valentines, I sat across from her at the dining room table writing out yet another grocery list. She held up the above Valentine and said, "What do you think mom??? This is for my favorite friend, Alexis." Of course I smiled and told her that it was the best Valentine in the history of Valentine's Day. It was my duty. I asked her to open it so that I could read what she wrote. Inside, she had carefully written, "I lick you a lot."

Classic.

In other news, (which happens to be Maddux's favorite new phrase and we hear it 237 times a day) whomever cut Breuklyn's bangs needs to adjust her scissors or something. Because surely it couldn't have been, ahem, me that cut her bangs like that. Yeah. No way. Wow.

Saturday, February 14, 2009

Happy Valentine's Day!

Happy Valentine's Day!!! Are you having a fun day?

When I was growing up, my mom always made pink heart shaped pancakes for breakfast on Valentine's Day. I most certainly can't break tradition, now could I? I also used this mold to make heart shaped eggs. :)

I think I may have gotten a little carried away...

It was nice to have a big family breakfast. In the little bowls, you can see Hershey's Kissables and lots of conversation hearts. Not only do I allow my kids to have cupcakes for breakfast, sometimes we have candy! -Gasp!-

We used the Making Memories Love Notes line of patterned papers to make this super cute Valentine's gift for Breuklyn's Kindergarten teacher. Breuklyn cut out the hearts and then glued them together to make the flowers. I used a hole punch to make a hole in the center of the "flower" so that I could insert the stick for the Tootsie pop. Breuklyn added some ric rac to look like leaves, and it also held the Tootsie pop in place. We used the Love Notes paper to make a little, "Thanks a bunch!" card and were done. Her teacher loved it and Breuklyn was proud that she made the project herself.

We made cookies to go along with her Valentine's Day cards. I used the Wilton Heart Pan to make the heart shaped cookies. Once they had completely cooled, I dipped them in white chocolate and decorated them with various sprinkles and red frosting. I let them sit overnight before I packaged them in sandwich bags.

I think that Breuklyn's Valentines were really sweet. She was proud that she was able to write out the names of everyone in her class all by herself and was happy that she had made something special for her friends.

Valentine's Day was a huge success at my house. How was your day? Are you ready to count down to Easter???

Sunday, February 1, 2009

Valentine's Day Countdown!

It's February!! Yippee! I love Valentine's Day. I love it because it brings my focus back to the people that I love. Since we had so much fun with the Christmas Advent stockings I thought it would be fun to try some Valentine's hearts. I love it when a project turns out exactly how I planned.

These are really easy to make. Felt, buttons, a few straight pins and a sewing machine was all it took. I painted a few clothespins, added some number stickers and I was ready to go!

I went a little crazy with the sewing machine. Fun times.

Some of the hearts have little pockets on them where I can stash a few conversation hearts for the kids.
On the back of each heart there is a little tag (from the Making Memories Love Notes line) that lists what we will be doing that day. I have lots of crafts planned, cupcakes and cookies to bake for friends and each person in the family will have a special day. Tomorrow is "We Love Paizlee!" day. On each person's special day they get to choose what we have for dinner and then they get to choose the family game/movie/activity for that evening.

Today was the first day and we made Mosaic Hearts. I got the idea from my dear friend Patrizzia. I always know that I can find crafty inspiration from her! :)

For "We Love Paizlee!" day we will probably be spending a lot of time playing tea party. I can't wait! Have a great Monday!!